
drip irrigation installation guide pdf
Drip irrigation is a highly efficient watering method delivering water directly to plant roots. It reduces runoff, evaporation, and waste, promoting healthy plant growth with minimal environmental impact.
What is Drip Irrigation?
Drip irrigation is a water delivery system that distributes water directly to plant roots through a network of tubes and low-volume emitters. It minimizes runoff and evaporation by releasing water slowly and precisely. This method uses pressurized pipes with built-in drip emitters, ensuring water is delivered consistently. Ideal for various plants and soil types, drip irrigation is highly efficient and adaptable. It is particularly effective for crops, gardens, and landscapes, as it provides plants with the exact amount of water they need. This system is known for its ability to reduce water waste and promote healthy plant growth. It is also suitable for both surface and subsurface installations, making it versatile for different agricultural and residential applications.
Benefits of Drip Irrigation
Drip irrigation offers numerous advantages, including water conservation, increased crop yields, and reduced labor costs. By delivering water directly to roots, it minimizes evaporation and runoff, ensuring up to 90% water efficiency. This method reduces soil erosion and nutrient leaching, promoting healthier plant growth. Drip systems are adaptable to various terrains and soil types, making them ideal for both small gardens and large-scale agriculture. They also allow for precise application of nutrients and chemicals, enhancing plant health. Additionally, drip irrigation lowers energy costs compared to traditional sprinkler systems, as it operates at lower pressure. Its ability to maintain consistent soil moisture levels reduces plant stress, leading to higher productivity and better crop quality. Overall, drip irrigation is a sustainable and effective solution for modern farming and landscaping needs.
Brief History of Drip Irrigation
Drip irrigation traces its origins to the early 20th century, with modern versions emerging in the 1950s. Pioneered by Simcha Blass, an Israeli water engineer, the first practical drip system used plastic pipes with built-in emitters. Initially adopted in arid regions like Israel, it gained popularity worldwide for its water efficiency. Over the years, advancements in materials and technology have improved its design and accessibility. Today, drip irrigation is a cornerstone of sustainable agriculture, reducing water waste and enhancing crop productivity globally.

Planning Your Drip Irrigation System
Effective planning ensures optimal water use and system efficiency. Assess water quality, determine plant needs, and design a layout to meet specific crop requirements.
Assessing Water Quality
Assessing water quality is crucial for a drip irrigation system to prevent clogging and ensure efficiency. Test for pH levels, dissolved solids, and suspended particles. High levels of minerals like calcium and magnesium can cause scaling, while particulate matter may block emitters. Consider installing filters to remove debris and chemicals, especially if using well or reclaimed water. Regular water analysis ensures the system operates smoothly and extends its lifespan. Proper filtration and treatment are essential to maintain optimal water flow and plant health.
Determining Water Requirements
Determining water requirements is essential for designing an efficient drip irrigation system. Calculate the water demand based on plant type, soil characteristics, and climate conditions. Consider the crop’s water needs, soil moisture levels, and evapotranspiration rates. Measure the flow rate of your water source and ensure it matches the system’s requirements. Assess the irrigation frequency and duration to avoid overwatering, which can harm plants and waste resources. Use tools like soil moisture sensors or evapotranspiration data to refine calculations. Properly sizing the system ensures it delivers the right amount of water, promoting healthy plant growth while conserving water. Accurate water requirement determination is critical for system efficiency and long-term sustainability.
Creating a Layout Design
Creating a layout design for your drip irrigation system ensures efficient water distribution and optimal plant growth. Start by sketching the area, marking plant locations, and measuring distances. Consider the terrain, soil type, and water source placement. Plan the tubing layout, ensuring it reaches all plants without excessive runoff. Group plants with similar water needs to customize emitter flow rates. Include valves and filters in strategic locations for easy maintenance. Label each component for clarity. Use grid paper to scale your design accurately. A well-planned layout minimizes waste, reduces installation complexity, and ensures every plant receives the right amount of water. Proper design enhances system performance and longevity.
Designing the Drip Irrigation System
Designing a drip irrigation system involves selecting components, calculating flow rates, and ensuring proper pressure. It requires balancing water quality, emitter spacing, and system layout for efficiency and plant health.
Choosing the Right Components
Selecting appropriate components is crucial for a functional drip irrigation system. Start with a reliable water source and filtration system to prevent clogging. Tubing and drip emitters should match plant water needs and soil type. Pressure regulators and valves ensure consistent water flow, while fittings and connectors provide durable connections. Consider the climate and plant requirements when choosing materials to maximize efficiency and longevity. Proper component selection ensures optimal water delivery and system performance, making it essential to research and choose high-quality, compatible parts tailored to your specific irrigation needs and environmental conditions.
Calculating Pipe and Emitter Placement
Accurate calculation of pipe and emitter placement ensures even water distribution and optimal system performance. Begin by assessing water pressure and flow rate to determine the appropriate tubing size and emitter spacing. Emitter spacing should align with plant water requirements and soil type, typically ranging from 12 to 24 inches apart for most crops. Use a measuring tape to mark emitter locations along the tubing, ensuring proper coverage for root zones. Create a detailed layout plan to visualize pipe routes and emitter positions. Consider soil moisture sensors for precise placement. Properly spaced emitters and pipes ensure efficient water delivery, promoting healthy plant growth and minimizing waste. Regular adjustments may be needed based on plant response and soil conditions.
Components of a Drip Irrigation System
A drip irrigation system comprises a water source, filtration unit, tubing, drip emitters, pressure regulators, and valves, each playing a crucial role in efficient water delivery.
Water Source and Filtration
The water source for a drip irrigation system can be a well, municipal supply, or stored water. Filtration is essential to prevent clogging of emitters and tubing. Common filters include screen, sand, and disc types, chosen based on water quality. Regular maintenance ensures optimal system performance. Clean filters prevent debris buildup, which can block water flow. Proper filtration extends system lifespan and ensures consistent water delivery to plants. Always assess water quality before installation to select the appropriate filtration method. This step is crucial for the long-term efficiency and reliability of the drip irrigation system.
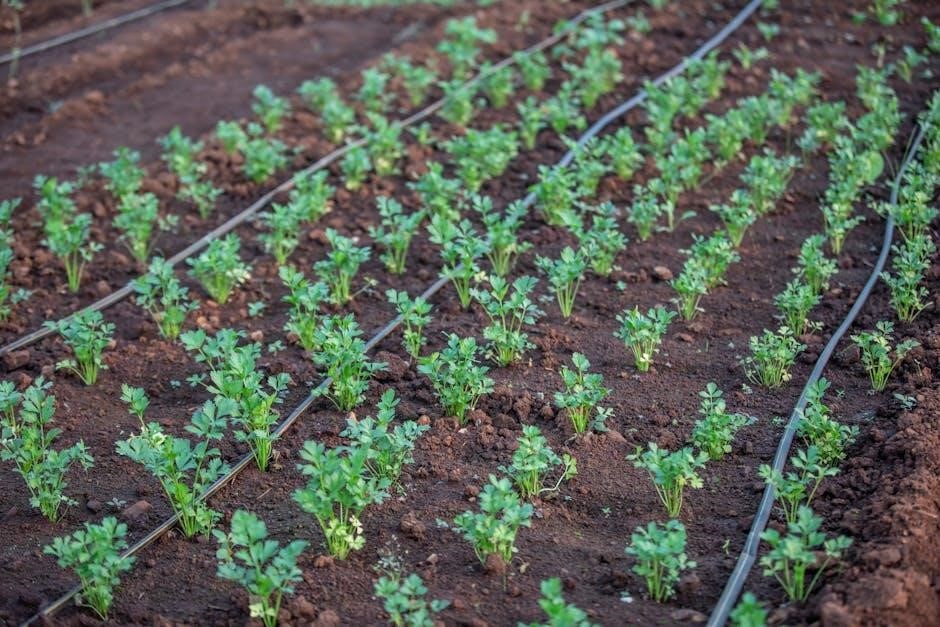
Tubing and Drip Emitters
Tubing is the backbone of a drip irrigation system, distributing water from the source to emitters. It comes in various materials like PVC, polyethylene, or recycled plastics, each offering durability and flexibility. Drip emitters are devices that release water at a controlled rate, ensuring precise moisture delivery to plants. They can be inline, button, or punch-in types, catering to different layouts and plant spacings. Proper selection of tubing and emitters ensures efficient water distribution and prevents clogging. Regular inspection and maintenance are crucial to uphold system performance. Tubing should be UV-resistant and suitable for underground or above-ground use, while emitters must align with water pressure and flow requirements. This balance ensures optimal irrigation for healthy plant growth.
Pressure Regulators and Valves
Pressure regulators and valves are essential components in a drip irrigation system, ensuring water flows at the correct pressure. High pressure can damage tubing and emitters, while low pressure may result in inadequate water distribution. Pressure regulators stabilize water pressure, typically maintaining it between 10-30 PSI, which is ideal for most drip systems. Valves, including ball valves, check valves, and solenoid valves, control water flow, allowing for precise irrigation scheduling and zone management. Proper installation of these components ensures efficient operation, prevents leaks, and extends system lifespan. They also enable easy maintenance by isolating specific sections of the system when needed. Regular inspection is crucial to ensure optimal performance and prevent issues like clogging or pressure fluctuations.
Fittings and Connectors
Fittings and connectors are vital for securing and directing water flow in a drip irrigation system. They include couplers, tees, elbows, and end caps, ensuring a watertight connection between tubing sections. Properly selected fittings prevent leaks and maintain system pressure. When choosing fittings, compatibility with tubing size and material is crucial to avoid connection issues. UV-resistant and durable connectors are recommended for outdoor use to withstand environmental conditions. Regular inspection of fittings ensures they remain secure and functional. Correct installation techniques, such as using Go-No-Go gauges, help maintain system integrity. High-quality fittings minimize the risk of cracks and leaks, ensuring reliable water distribution. Properly fitted connections are essential for the system’s efficiency and longevity, making them a cornerstone of a well-designed drip irrigation setup.

Installation Steps
Installing a drip irrigation system involves preparing the site, laying tubing, connecting components, and testing the system for leaks and proper water flow distribution.
Preparing the Site
Preparing the site for drip irrigation involves clearing the area of debris, leveling the ground, and measuring the space where the system will be installed.
Mark the layout of the tubing and emitters according to your design plan.
Ensure the site is free from obstructions and underground utilities.
Gather essential tools like gloves, a utility knife, and measuring tape.
If installing under soil, check the drip line’s compatibility with subsurface conditions.
Proper site preparation ensures efficient water distribution and prevents potential issues during installation.
Laying Out the Tubing
Laying out the tubing is a critical step in installing a drip irrigation system.
Begin by unrolling the main tubing and positioning it according to your design plan.
Secure the tubing to the ground using stakes or clips to prevent movement.
For row crops or garden beds, lay the drip lines parallel to the plants, ensuring even water distribution.
If installing under soil, bury the tubing at the recommended depth to avoid damage.
Use measuring tools to maintain consistent spacing between drip lines and emitters.
Properly laying the tubing ensures water reaches all plants efficiently and reduces the risk of clogging or uneven irrigation.
This step sets the foundation for a functional and effective system.
Connecting Components
Connecting components in a drip irrigation system requires precision to ensure proper water flow.
Start by cutting the tubing at the desired length using a sharp utility knife or tubing cutter.
Insert drip emitters or fittings into the tubing, ensuring they are securely attached.
Use barbed or push-fit connectors to link sections of tubing, and tighten any threaded fittings by hand or with a wrench.
For filters, valves, and pressure regulators, follow the manufacturer’s instructions for installation.
Double-check all connections to prevent leaks and ensure water flows evenly.
Properly connected components are essential for maintaining system efficiency and preventing clogs or water waste.
This step requires patience and attention to detail to guarantee optimal performance.
Testing the System
Testing the drip irrigation system ensures all components function correctly.
Begin by turning on the water supply at low pressure to prevent sudden surges.
Inspect each emitter for consistent water flow, checking for blockages or uneven distribution.
Verify that pressure gauges and regulators are within the recommended range.
Check all connections and fittings for leaks, tightening any loose parts.
Run the system for at least 30 minutes to observe performance under normal operation.
Adjust emitters, valves, or tubing as needed to achieve balanced water delivery.
Testing is crucial to identify and fix issues before they affect plant growth.
A well-tested system ensures efficiency, longevity, and optimal watering results.

Maintenance and Troubleshooting
Regular maintenance ensures optimal performance of drip irrigation systems.
Clean filters, flush lines, and inspect for leaks and damage.
Address issues promptly to prevent clogs and water waste.
Cleaning and Flushing the System
Cleaning and flushing are crucial for maintaining a drip irrigation system. Start by turning off the water supply and disconnecting components like filters and emitters. Use a soft brush to remove debris from screens and emitters. For severe clogs, soak parts in a mild vinegar solution. Flush the entire system by opening end caps and allowing water to flow through the tubing; Regular cleaning prevents mineral buildup and ensures water flows evenly to plants, maintaining system efficiency and longevity. Schedule this maintenance seasonally or as needed based on water quality and usage. Consistency is key to preventing clogs and ensuring optimal performance.
Inspecting for Leaks and Damage
Regularly inspecting your drip irrigation system for leaks and damage is essential for maintaining its efficiency. Walk through the system, checking tubing, fittings, and emitters for visible cracks, cuts, or wear. Look for water pooling or uneven flow, which can indicate hidden leaks. Use a pressure test kit to identify drops in pressure that may signal issues. Replace damaged components promptly to prevent further problems. Inspect filters and clean them if necessary, ensuring proper water flow. Addressing issues early prevents system downtime and ensures plants receive consistent watering. Schedule inspections seasonally or after extreme weather events to maintain system integrity and performance.
Winterizing the System
Winterizing your drip irrigation system is crucial to protect it from freezing temperatures and damage. Start by draining all water from the tubing and components to prevent ice formation. Use an air compressor to blow out remaining water from the pipes, ensuring no moisture is left. Insulate above-ground components like valves and backflow preventers to shield them from cold. Store any vulnerable parts in a protected area to avoid winter damage. Before restarting in spring, inspect the system for cracks or wear caused by freezing. Proper winterization ensures your drip irrigation system remains functional and ready for the next growing season, saving time and reducing repair costs.

Common Mistakes to Avoid
Incorrect emitter spacing and ignoring water pressure requirements are common errors. Ensure proper spacing for even water distribution and check pressure to prevent system damage or inefficiency.
Incorrect Emitter Spacing
Incorrect emitter spacing is a common mistake that can lead to uneven water distribution. Emitters spaced too far apart may leave plants under-watered, while spacing them too close can waste water. Proper spacing depends on soil type, plant water requirements, and system flow rate. For most drip systems, emitters are spaced 12-24 inches apart, but this can vary. Overcrowding emitters can cause pressure issues, reducing overall efficiency. Always consult the manufacturer’s guidelines and consider crop water demands to ensure optimal spacing. Correct emitter placement ensures uniform moisture distribution, promoting healthy plant growth and water conservation. Regularly inspect and adjust spacing as plants grow or soil conditions change.
Ignoring Water Pressure Requirements
Ignoring water pressure requirements is a critical mistake in drip irrigation. Most systems operate best within a specific pressure range, typically between 10-30 PSI. Exceeding or falling below this range can lead to clogged emitters, uneven water distribution, or system damage. High pressure can cause tubing to burst or fittings to leak, while low pressure may result in insufficient water flow. Always check the manufacturer’s specifications for recommended pressure limits. Installing a pressure regulator can help maintain optimal pressure. Regularly monitor system performance to ensure it operates within the desired range. Neglecting pressure requirements can lead to poor irrigation efficiency and increased maintenance costs over time. Proper pressure management is essential for a reliable and effective drip irrigation system.
Not Monitoring System Performance
Failing to monitor system performance is a common oversight in drip irrigation. Regular inspections ensure all components function correctly, preventing issues like clogged emitters or leaks. Check water flow, pressure levels, and soil moisture to maintain optimal irrigation. Over time, factors like water quality changes or weather conditions can affect performance. Neglecting these checks may lead to inefficient watering, stressed plants, or even system failure. Use tools like soil moisture sensors or smart controllers to streamline monitoring. Schedule periodic maintenance to address any issues promptly. Consistent oversight ensures the system delivers water effectively, supports plant health, and minimizes waste. Monitoring is crucial for long-term efficiency and reliability of the drip irrigation system.
Advanced Techniques
Advanced techniques enhance drip irrigation efficiency through smart controllers and soil moisture sensors, enabling precise water delivery and automated adjustments for optimal plant care and resource conservation.
Integrating Soil Moisture Sensors
Soil moisture sensors are advanced tools that monitor soil conditions, ensuring optimal water delivery. These sensors collect data on soil hydration levels, allowing the drip irrigation system to automatically adjust water flow based on real-time feedback. By integrating sensors, growers can prevent overwatering and underwatering, promoting healthier plant growth. Sensors like the TEROS 12 provide precise and dependable soil data, enhancing irrigation efficiency. This technology is particularly useful in large-scale agriculture, where manual monitoring is impractical. Automation reduces labor costs and ensures consistent water application, even in varying soil types and weather conditions. Proper installation and calibration of sensors are crucial for accurate readings and seamless system operation, making them a valuable addition to modern drip irrigation setups.
Using Smart Controllers
Smart controllers are innovative devices that optimize drip irrigation systems by automating water delivery based on soil moisture, weather conditions, and plant needs. These controllers use data from sensors and weather stations to adjust irrigation schedules, ensuring plants receive the exact amount of water required. They can be programmed to account for factors like soil type, crop type, and evapotranspiration rates. Smart controllers reduce water waste and improve crop yields by preventing overwatering and underwatering. Additionally, they often come with remote access capabilities, allowing users to monitor and adjust irrigation settings via smartphones or computers. This level of precision and control makes smart controllers a valuable upgrade for both residential and commercial drip irrigation systems, enhancing efficiency and sustainability.
Drip irrigation is a sustainable and efficient watering method. Proper planning, installation, and maintenance ensure optimal performance, conserving water and promoting healthy plant growth effectively.
Final Tips for a Successful Installation
For a successful drip irrigation setup, start by assessing water quality to prevent clogs. Use gloves, a utility knife, and measuring tools for precise installations. Lay tubing carefully, ensuring emitters are spaced correctly based on plant needs. Connect components securely and test the system thoroughly. Regular maintenance, like flushing and inspecting for leaks, is crucial for longevity. Consider integrating soil moisture sensors and smart controllers for advanced efficiency. Always follow manufacturer guidelines and local regulations. Proper planning and attention to detail ensure a well-functioning system that conserves water and promotes healthy plant growth. Refer to guides like the Toro Blue Stripe for additional tips and best practices.
Resources for Further Learning
For further learning, refer to the Toro Blue Stripe Drip Planning & Installation Guide, which offers detailed instructions and best practices. Colorado State University’s guide on drip irrigation provides comprehensive insights into system design and maintenance. Explore resources like Hunter’s technical specifications for inline drip products, such as PLD. Additionally, the TEROS 12 soil moisture sensor brochure offers advanced solutions for precision irrigation. Online forums like GardenWeb and specialized irrigation communities share practical advice and real-world experiences. These resources will help you refine your skills and stay updated on the latest techniques in drip irrigation, ensuring optimal results for your projects.